⚠️ Important notice: This device has been discontinued and support is no longer available.
What you’ll need
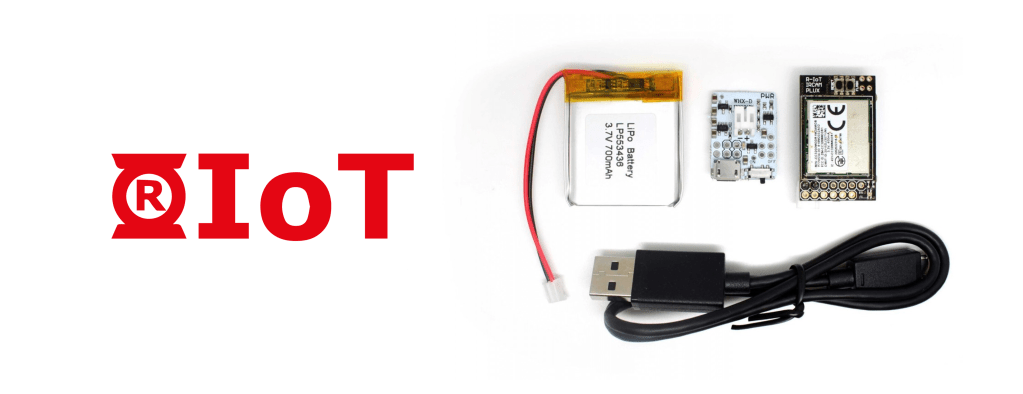
For this setup, you will need the following products:
- 1x (or more) R-IoT systems
- 1x Router (a pre-configured TP-Link TL-MR3020 or you configure your own)
- OpenSignals (r)evolution software (Windows or macOS)
Step 1: Configuring your R-IoT
Default Configuration
R-IoT devices come pre-configured to connect automatically to R-IoT-compatible networks with the following general configurations:
- WiFi name: riot
- Password protection: off
- R-IoT access port: 8888
If you’re using only a single R-IoT device and a PLUX-provided pre-configured router (or another router with compatible settings; see to Step 3 of this guide) you can proceed with the next step.
Otherwise, proceed with the following instructions.
💡 Helpful Tip: For instructions on how to connect your R-IoT to your own WiFi, see the FAQs at the end of this page.
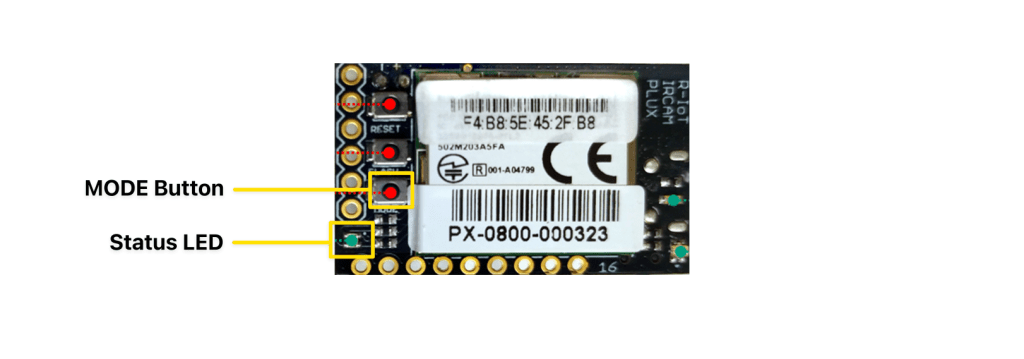
Configuration Mode
The configuration mode allows you to edit all R-IoT configurations through an admin panel. You can access this panel by following these steps:
Step 1: Make sure your R-IoT is turned off
Step 2: Press and hold the MODE button

Step 3: Keep the MODE button pressed, turn the device on. Continue keeping the MODE button pressed as the Status LED cycles through red and green colors.
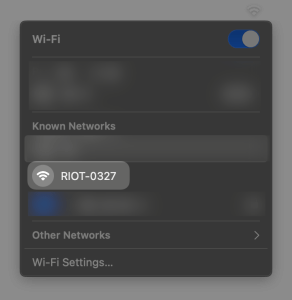
Step 5: The R-IoT is now in configuration mode where it acts as a router you can connect to. Connect your computer to the R-IoT WiFi.
Step 6: Open your browser and visit the 192.168.1.1 page (IP address of your R-IoT) to access the configuration panel.

Port Configuration for Multi-Device Recordings
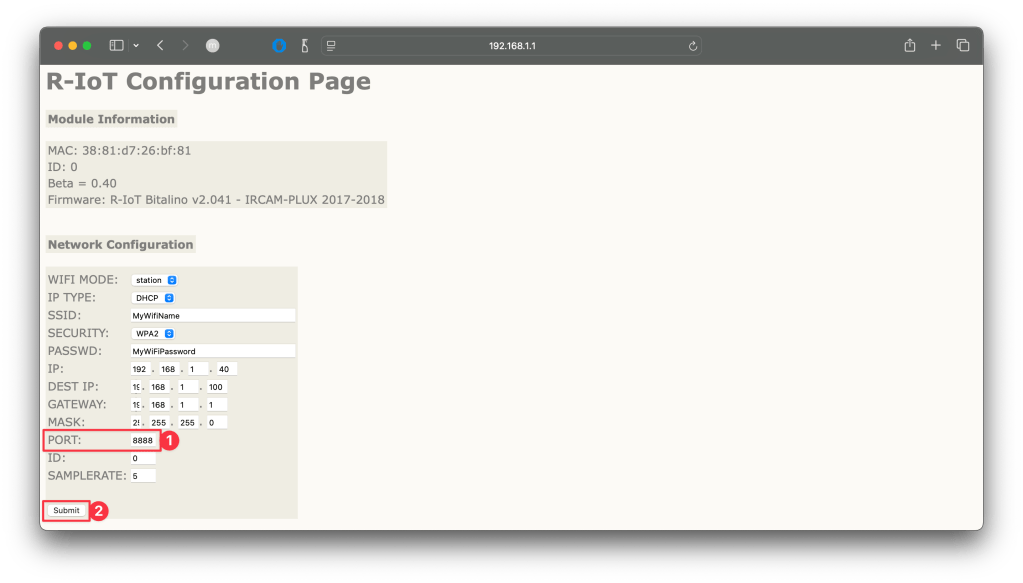
R-IoTs are pre-set to use the default communication port 8888. However, each port can only be used by one device. For multi-device recordings, a manual change of the ports for each device is needed.
Enter the R-IoT’s configuration mode and access its admin panel. Set your preferred port number for the device in the PORT field (example: 8888) (1) and click the Submit button to save the changes (2). Repeat the process for all your other R-IoTs.
💡 Helpful Tip: We recommend the following sequential numbering of ports for the number of devices you have: R-IoT #1 – Port 8001, R-IoT #2 – Port 8002, etc.

Step 2: Configuring your router
The following configuration uses a TP-Link Portable 3G/4G Router (TL-MR3020) that can be provided with R-IoT compatible pre-sets by PLUX.

Before we proceed… can I use other routers?
Yes, you can! R-IoT devices connect automatically to networks with the following configuration, which you can apply on your own router. Not e that we recommend having a dedicated network to work with your R-IoTs. We do not recommend using your main router that provides your internet connection for this use.
WiFi configuration:
- Network Name (SSID): riot
- Security (WiFi Password): none; leave the network open
- Mode: 802.11 b/g/n mixed
- Channel settings: Auto
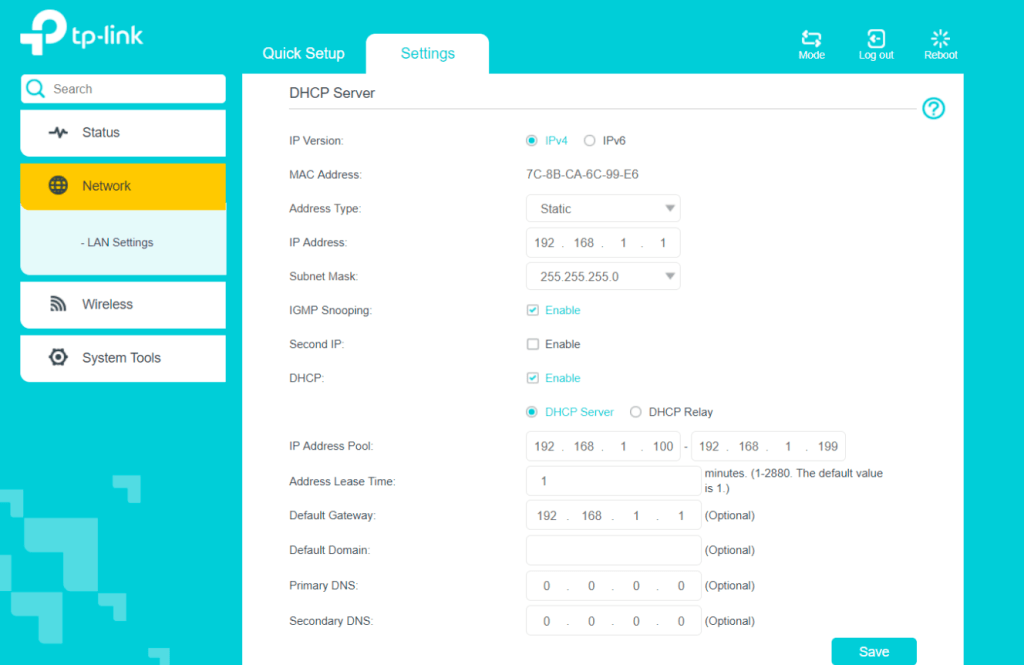
IPv4 configuration:
- Address Type: Static
- IP Address: 192.168.1.1
- Subnet Mask: 255.255.255.0
- IP Address Pool: 192.168.1.100 to 192.168.1.199
For more detailed information, please follow the detailed instructions in the R-IoT user manual.
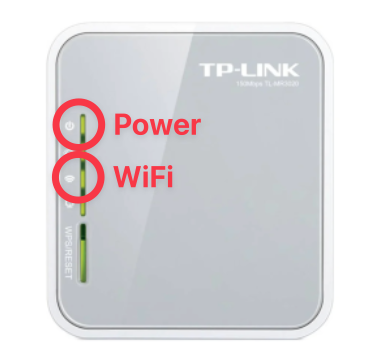
Using the pre-set router, Set the route to Access Point (AP) mode by moving the switch to the very right state (AP).

Power the router using the micro-USB cable that comes with it. The router automatically turns on up once power is provided and will become visible within a few moments (wait until the WiFi light turns greent.
If your router is preset for the R-IoT systems, it’ll be listed as “riot” wifi. Connect to it.

We recommend visiting the router’s admin panel through tplinkwifi.net (login as admin) and double-check your network configurations before proceeding with the next steps. You should see the following configurations:

Step 3: Connect your R-IoT to your router
Turn your router on in Access Point (AP) mode (see Step 2) and wait a few seconds for the router to fully boot (both the power and WiFi light should be on).
Turn the R-IoT device on. It’s status LED will blink through a sequence of different colors. Once it turns and remains blue, it means it’s connected to your router.
Step 4: Set up your R-IoT in OpenSignals
Start OpenSignals and enter the device manager.

In the device manager, enter the IP address of your computer (default: 192.168.1.100) followed by the port number of your R-IoT (default: 8888) in the search field in the following format IP:PORT (example: 192.168.1.100:8888).
Press enter or click the magnifying glass to search for the R-IoT device.

Reminder: If you set your own network configuration including changes to the IP address management and the port of the R-IoT device, you need to adjust the IP:PORT search input accordingly. See further instructions in the FAQs below.
When successfully found and connected, the R-IoT device will appear in the device manager as follows:
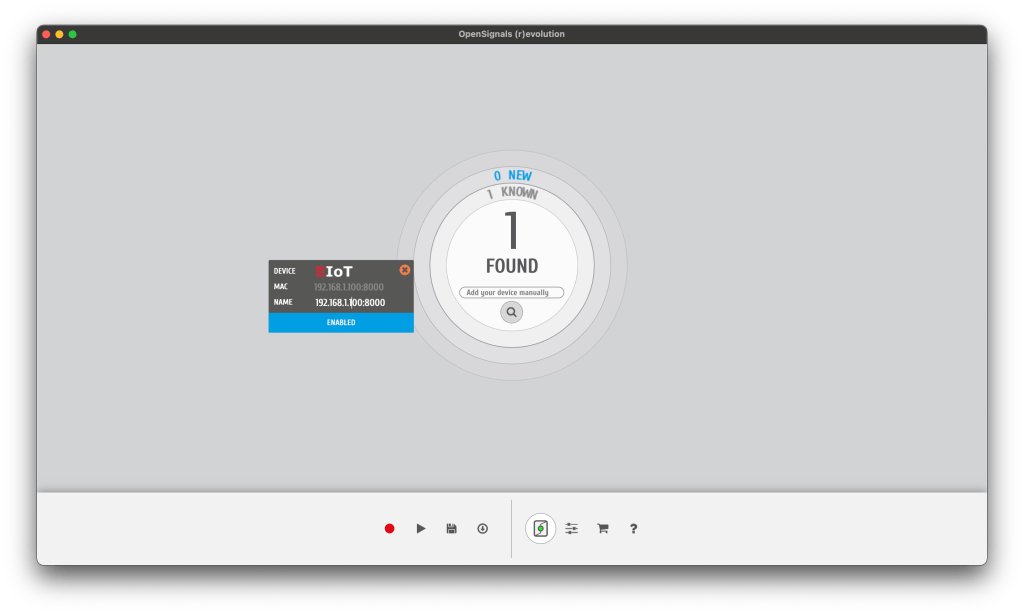
You can click on the R-IoT device to edit the recording settings, such as the number of channels and sensors you want to record from.

Ensure that the R-IoT device is enabled for recording ( ENABLED button on the device manager must be blue).
The device panel of the R-IoT in OpenSignals is blue and it can’t connect what should I do?
If your R-IoT device appears in blue in the device manager it means that OpenSignals was not able to connect to it. Your screen should look similar to this:

Check the FAQs & Troubleshooting section for possible sources of the problem.
Step 5: Start a recording
Once you’re done with your setup, press the recording button in the OpenSignals interface to start your recording.

OpenSignals will connect to the riot and start visualizing the recorded sensor data in real-time:

And that’s it! You’ve successfully recorded R-IoT sensor data with OpenSignals.
FAQs & Troubleshooting
Why is my R-IoT blinking green?
Your R-IoT device is in idle mode and not connected to your router. Ensure that the router is turned on and that your R-IoT and router are properly configured to find each other (see Step 2 and 3).
Once it is properly connected to the WiFi, the R-IoT’s LED will turn blue.
How can I double-check if my R-IoT is connected to my router?
You can double-check this connection by going into the router’s admin panel (visit tplinkwifi.net and login as admin) and accessing the list of devices that are connected to your router under Network > Settings > Client List (this specific list changes based on the router model you’re using).
A device with the MAC-Address of your R-IoT (see the label on the R-IoT) should be listed here.
Can I connect my R-IoT to another WiFi not called riot?
Yes, this is possible. Enter the R-IoT configuration mode and access its admin panel.
In the configurations, change the name of the SSID from riot to the name of your WiFi network (example here: SSID: MyWiFiName) (1).
We recommend that you access the admin panel of your router to double-check if the MAC address of the R-IoT is listed under connected devices to make sure everything is set up properly.

We recommend accessing the admin panel of your router to double-check if the MAC address of the R-IoT is listed under connected devices to ensure everything’s set up properly.
Can I connect my R-IoT to a password-protected WiFi?
Yes, this is possible with WPA2 protected networks.
Enter the R-IoT configuration mode and access its admin panel. In the configurations, change the name of the SECURITY type from None to WPA2. Enter the password in the PASSWD field (1).
Click the Submit button to save the changes (2). Restart your R-IoT, and it should connect to the new WiFi.

We recommend that you access the admin panel of your router to double-check if the MAC address of the R-IoT is listed under connected devices to make sure everything is set up properly.
How do I change the communication port number of my R-IoT?
Enter the R-IoT configuration mode and access its admin panel. In the configurations, change the value in the PORT field (example: from 8888 to 8001).
Click the Submit button to save the changes (2). Restart your R-IoT, and it should connect to the new WiFi.
My computer’s IP address on my WiFi is not 192.168.1.100. What should I do?
R-IoT’s are preset to send all their sensor data to target IP, which, by default, is set to 192.168.1.100. PLUX-provided router with a pre-configured riot network apply this IP to your computer and the R-IoT will send all its sensor data to your computer.
If you manually changed the IP address of your computer or are using other non-standard routers or router configurations (example: your own WiFi) the IP address of your computer might be a different one and needs to be corrected in the R-IoT settings.
💡Helpful Tip: To avoid issues such as dynamic changes of IP addresses, we recommend configuring your router to static IPs instead. This way, once your computer’s IP is set it will remain the same until this setting is changed, providing you a static address to configure your R-IoTs for. Note that switching from dynamic to static IPs can impact your other network devices. Proceed with care.
First, find your computer’s IP address.
On Windows:
- Hold the
Windowskey and press theXkey to open the Power User menu. - Select Network Connections.
- Right-click on your active network connection (e.g., Wi-Fi or Ethernet) and choose Status.
- In the Status window, click on Details.
- Your local IP address will be listed under “IPv4 Address.”
On macOS:
- Press and hold the option button on your keyboard
- Click on your WiFi icon in your Finder’s toolbar
- Your local IP address will be listed under “IP Address”
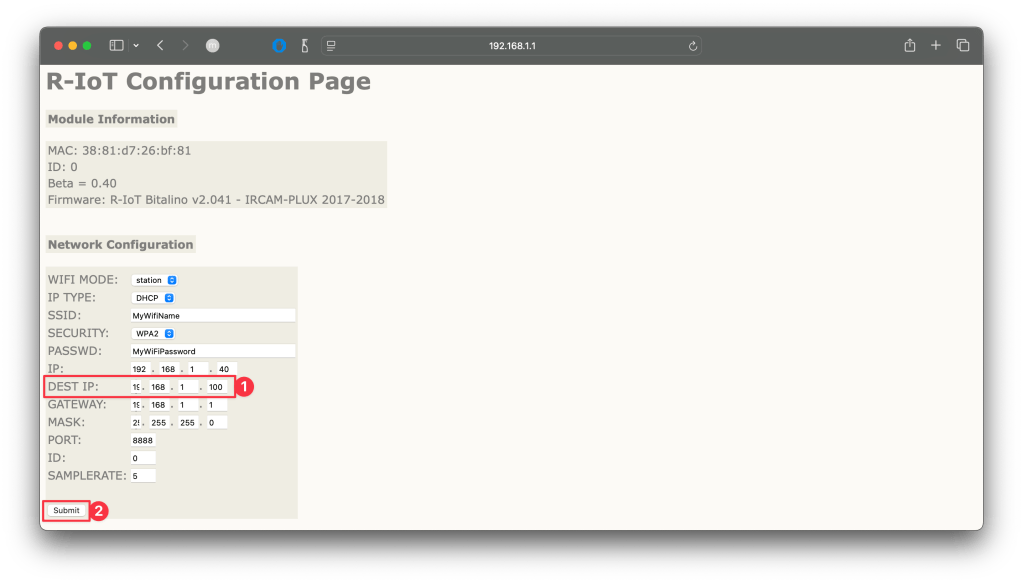
Once you have your IP, enter the R-IoT configuration mode and access its admin panel. In the configurations, insert the IP your computer in the DEST. IP field (1).
Click the Submit button to save the changes (2). Restart your R-IoT. Proceed with connecting to OpenSignals using the IP:PORT combination to connect to your R-IoT as shown in Step 4 of the main guide above.
I can’t connect my R-IoT to OpenSignals nor can I find it. What should I do?
Same network? Ensure that both devices are connected to the same WiFi network.
Custom network? If you’re using your own WiFi network instead of a dedicated riot network, check if you’re using the correct IP address of your computer. You can find more info in the FAQs above.
Wrong communication port? Check if you’re addressing the correct communication port. R-IoT’s are by default pre-set to port 8888 but this part can be changed by the user or when multiple R-IoTs are being used
Wrong target IP? Check if you’re using the correct IP address to connect to the R-IoT and not the MAC-address listed on a label on the device. The IP address consists of the IP address of your computer + the communication port number of your R-IoT (example: 192.168.1.100:8888).
By default the target IP (your computer) is set to 192.168.1.100 but this can change if you have a router that dynamically changes IP addresses. Set the correct target IP in the R-IoT configuration panel.